Showing posts with label electronics. Show all posts

Saturday, December 31, 2011

Moving On to New Challenges


I look back on 2011 as a great success! Building 6 robots, making new friends, showing off our collective skills in some competitions. After all of that work is has been good to be on vacation.

I have been a busy circuiteer this vacation (I hope Apple doesn't sue me for building an 'I Stand')!
(A stick with an alligator clip to hold my FET sensor). Using a LCD with the PICAXE has been more useful than I thought; it is nice to get telemetry without the debug screen. I have been trying to improve my static field detector to self calibrate and to adjust to changing atmospheric conditions (when the air gets dry, by basic system goes into constant alarm because the floor level of static energy is high).

I have also revisited the FEZ Domino (have not ordered the FEZ Panda II yet); have repeated most all of the exercises in the FEZ Tutorial (though I still hardly understand object-oriented blah blah (OO). Getting C# to do basic things is not too hard; the leap here is combining a lot of basic things into a real-world embedded project with classes, inheritance, etc. Controlling LEDs, relays, LCD, is a piece of cake. The payoff for trudging through this is to acquire new capabilities like reading and writing to a RAM stick, connecting to networks and making an internet appliance.

I have ordered several Texas Instruments (TI) Launch Pad kits. That exercise in ANSI C will be all about manipulating the registers to get the outputs we want. The TI guide for the Launch Pad has what I was missing a year ago when I first tried to master the MSP430 processor: a guide to set up the A/D converters. If I overcome the novice challenges, I can than make use of my other TI modules (and my fancy wristwatch) (I have wireless sensors and a couple of USB development tools that have been accumulated over the years. My watch has an accelerometer, temperature sensor, barometer and wireless link).

I will be creating new blogs for each of these endeavors (committed to open source).

Please keep me updated on your projects as well.

James


New Horizon 2012 with FEZ Panda II [Link]


2012 Detour with Texas Instruments MSP430
 
My real and previously stated goal for the year is to master the FEZ and C#; but I am considering an intermediate step for a couple of months and taking a wack at the Texas Instruments (TI) MSP430 which programs in ANSI C. It follows a logical progression of programing skill; begining with BASIC, then C, then C#. The financial commitment FEZ requires is $39-$140; TI offers a MSP430 starter kit for under $6. I have played with other TI MSP430 chips, and I can at least flash an LED. I would like to see just how different it would be to repeat some of the things we did with the PICAXE (less the robots) using C (i.e. motor control, PWM, RS-232, etc.) A refresher with C will help with the C#.
 
Anybody else want to take a stab at this with me? Together, (combining our experience and intellect) we can go a lot farther than 'flashing a LED' (as far as I got so far).
 
LaunchPad Kit [Link] 
 
James

Sunday, November 27, 2011

Dabbling with Dataloggers and RTC


Blog on RTC (Real Time Clock) and the makings of a data logger [Link]

AXE110 Data Logger Brochure [Link]

Example code for AXE110 [Link]

Example code for retrieving the data [Link]

Using i2c with PICAXE info [Link]

My other blogs [Link]

Saturday, October 8, 2011

Friday, October 7, 2011

Saturday, September 10, 2011

"Hotter/Colder" Talking Temp Sensor


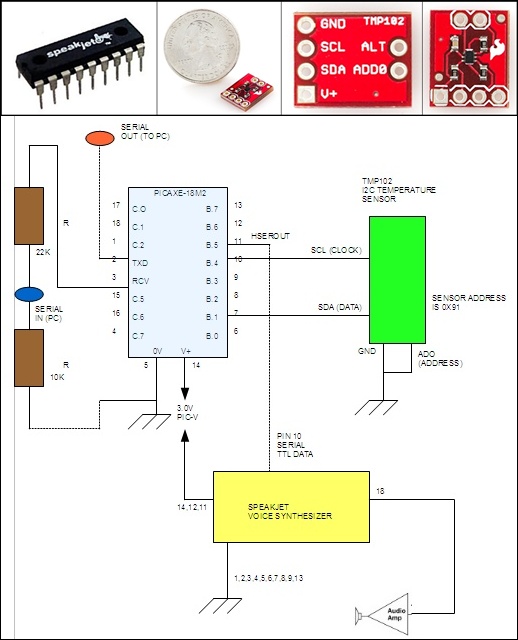
This builds on my previous 'Phrasealator' blog by having a PICAXE microcontroller control the SpeakJet voice synthesizer without a PC. I wanted to get familiar with I2C, a serial inter integrated circuit serial protocol commonly used so microprocessors can read data from any sensor 'on the I2C bus'. The sensor I used was TMP102, a Texas Instruments temperature sensor (available from SparkFun). It is a low power device, the whole circuit (excluding the amplified speakers) drew only 3mA. The basic code was less than 40 lines. In operation, the system compares the current temperature measurement to the last one, and if it has changed over a degree, it speaks either "hotter" or "colder". I used the free SpeakJet Phrasealator application to generate a phoenetic string, which I cut and pasted into my basic code. Its dictionary contained the word "hot", to which I added "AXRR" to get the 'ger' of "hotter".

hotter  \HE\OH\TT\AXRR = (20,96,21,114,22,88,23,5,6,183,136,191,151)

Video [Link]

Circuit Diagram [Link]

Basic Code [Link]

SparkFun [Link]

Parts List [Link]

My other interests (Kayaking, plant identification, etc.) [Link]

Monday, September 5, 2011

SpeakJet Voice Synthesizer Demo


I am playing around with the SpeakJet chip to give a future robot a voice. In this video, I am just checking it out in demo mode; which runs through all of the pre-programmed phonics. The chip is made by Magnavision and is available through SparkFun.

Video [Link]

Magnavision [Link]

SparkFun [Link]


Saturday, July 23, 2011

RCOC Robot Club Values


RCOC Values

Building robots is a fun activity; but for me there are also high ideals that guide my efforts. Helping others to succeed, encouraging experimentation, sharing knowledge, making learning fun, building friendships and inspiring a community of enthusiasts are all desires that focus my passion. Four inter-related disciplines that are foundational for this effort are summed up in the acronym RCOC:


R
Repeatability: this blog exists to serve other robot enthusiasts. That means I will try to refreign from using odd, one-of-a-kind or hard-to-obtain parts. Any person of average intelligence and strong desire should be able to reproduce anything posted here. I will do my best to assist anyone having technical issues.

C
C.O.T.S. (Commercial Off-The-Shelf (products)): robots will be built using generic parts from major vendors where possible (like McMaster Carr, Digi-Key, SparkFun, Pololu, Servo-City). Ideally, each part or a similar one should be available from multiple sources.

O
Open Source: everything is disclosed: electrical, mechanical drawings, source code and parts lists to enrich the community. That also means that everyone is encouraged to contribute to the knowledge base.

C
Competition: to promote creativity and excellence, non-destructive competitions will take place that will cultivate more robust, flexible and effective designs.


If you want to be a part of this community, contact me and join the E-mailing list (and not miss postings).

James the Quack

My other stuff (kayaking, plant ID, sea beans, etc.) [Link]


Robot Batteries


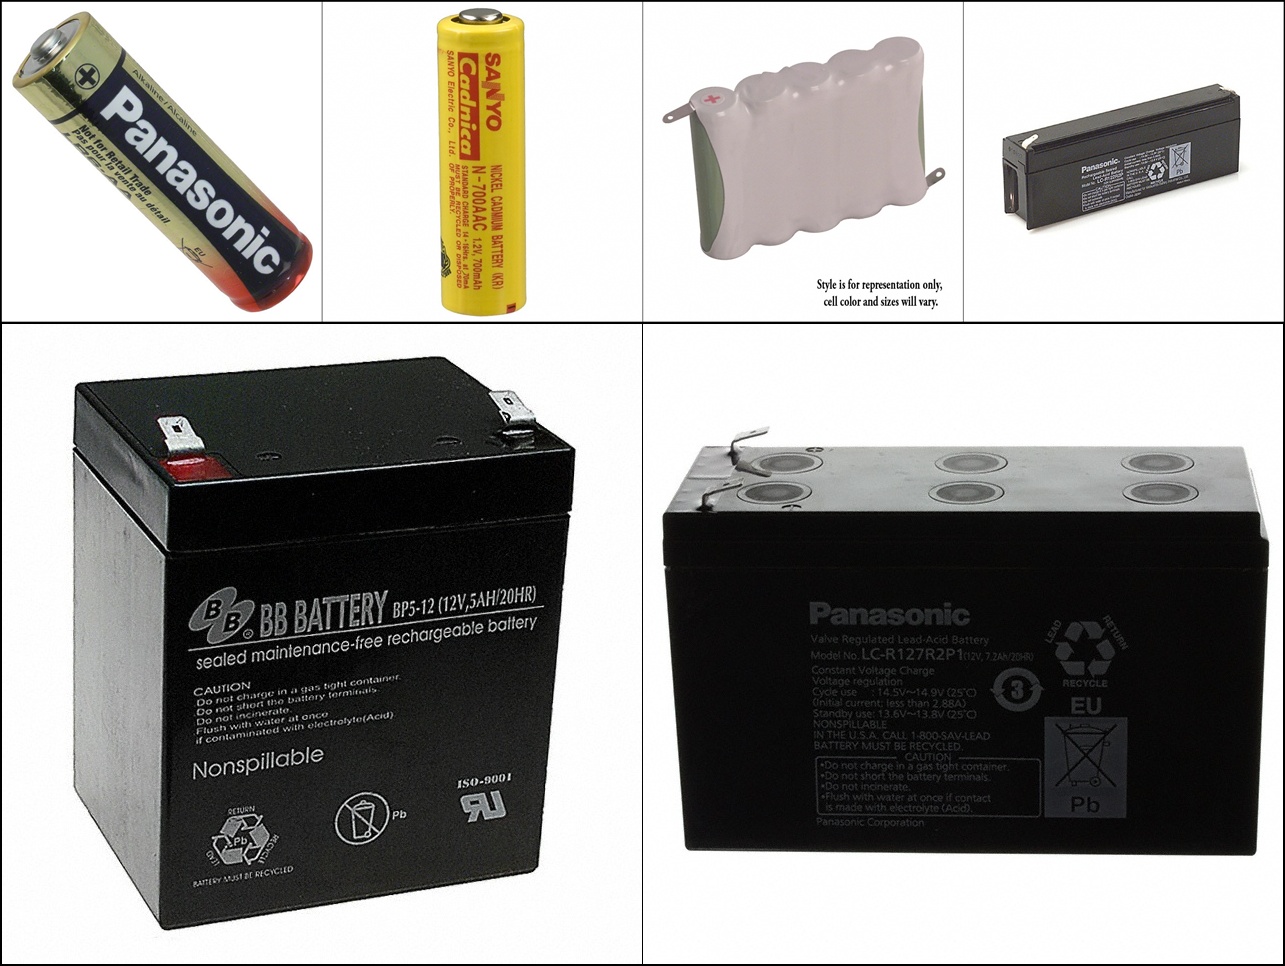
When I was playing with 'Jim-Bob', my toy tank-tread robot, I was appalled by how quickly those little gear motors ate AA batteries! I hate throwing AA alkaline batteries in the trash for so many reasons: environmental, financial and personal thrift. The weight of my first robot, 'Little Jimmy' was nearly 50% gel cell battery. The electric car industry faces similar dilemmas of achieving the needed voltage and capacity at the lowest possible weight and volume (bulk) at a cost people can accept. There are a lot of choices in battery chemistry for secondary (rechargeable) cells: lead acid, gel cells,  nickel cadmium, nickel metal hydride, lithium-ion polymer. They do not come without risk: a few years ago the industry had a rash of exploding lithium lap top batteries. Each type of battery chemistry requires a different charging system. (Batteries in the hands of idiots are dangerous!) Every element of robot design and construction requires research, and batteries are no exception. Attached is a matrix of my research on various battery specs. The conclusions I came up with is that for an Ant-Weight (1 lb) robot like 'Jim-Bob', a 6V NiMH battery pack is a good choice. For a Hobby-Class robot like 'Little Jimmy' (10 lbs) a lead acid gel cell is just fine.


Battery Matrix [Link]


My other interests (Kayaking, plant ID, sea beans, etc. ) [Link]

Saturday, July 9, 2011

Saturday, July 2, 2011

IR Remote Control of PICAXE Processor


In this blog I explore using a universal TV remote control to send IR signals to a PICAXE-18M2 micro-controller to  command a servo, LED and a gear-head motor to actuate. This demonstrates how a robot could be remote controlled easily and inexpensively.


My Instructable on the circuit:
[Link]

My video of the demo:
[Link]

My other stuff:
[Link]

Parts List:
[Link]

Circuit Diagram:
[Link]


Basic Code:
[Link]

Monday, June 20, 2011

Robot 1: "Little Jimmy"

Blog's Purpose

It has been a life-long dream of mine to build my own robots; but getting traction on actually assembling one proved difficult. Connecting wheels to motors is not as easy as it looks. Much of what is on the Web either assumed the hobbyist had a large budget, or access to machine shop. Robots can be built with C.O.T.S. (common, over-the-counter stock) if you know what to ask for (or 'Google'). Though I'm an Electronic Technician, there was a lot of mechanical terminology that I was not familiar with. It is my desire in this blog to share what I have learned and help many others succeed in building their own robot. As I build more robots, I intend to publish all circuit designs, drive trains, RC interfacing, battery charging systems and easy programming. I live in an apartment, so I also had to learn to scale down my tools and methods to work in that environment (limited space, noise concerns, thrift) so I will also detail how to work with tools and materials. Not only am I cheap, I'm a little green; recycling and scavenging wire, motors, batteries from any electronics on it's way to a landfill. Feel free to write, share your projects, ask for help.

Why Do I Build Robots?

They are neat! It stimulates my brain. Mechatronics is a synergy of mechanics, electronics, programming, art and science. This keep me studying and learning on myriad disciplines and have loads of fun at the same time.

Survey of Robotics Parts Sources
[Link]

My "Instructables" Blog (Step-by-step instructions)
[Link]

Photo Album of Building Robot 1
[Link]

 Video of "Little Jimmy's" First Steps
[Link]

Robot 1 Parts List
[Link]

Robot 1 Spec Sheet
[Link]

PICAXE Basic Code
[Link]

PICAXE Servo Receiver Motor Controller Circuit
[Link]

My other blogs and stuff (I'm interested in plant identification, nature, kayaking, sea beans, Christianity.......)
[Link]